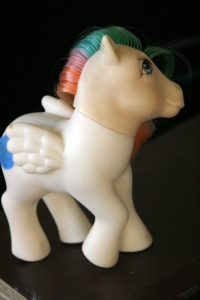
Cleaning
Dawn dish soap rubbed on with a soft tooth brush will remove most dirt and even dried stains from so soft ponies. Wet the pony first then apply the soap. GENTLY scrub with the toothbrush. Pat as much water off them as you can with a towel or napkin. When the pony is dry, gently brush the flocking with a dry soft toothbrush to re-fluff the flocking. If you need a stronger cleaner, the spray on version of OxiClean can safely be used on so softs. Many collectors also use spray on carpet cleaners. For more heavily stained, or completely yellowed so softs, many collectors have had a lot of luck whitening the with a bleach bath. The amount of bleach seems to be pretty arbitrary, but over all people seem to use a pretty weak bleach/water solution. This is often used in conjunction with sun fading. Be extremely careful as the bleach will fade the ponies hair, so don't let them soak for too long, and this cleaning method seems to be safest on white ponies. Be certain to thoroughly rinse off any chemicals you use and it's best not to use hot water on so softs.
Sun-fading will also fade many stains completely away, and is usually the next thing collectors try before harsher chemicals.. Cover everything but the affected area (especially hair, symbols, etc.) with aluminum foil and leave the pony in direct sunlight for as long as needed. This can be weeks or months and works best in areas that are particularly sunny.
Sun-fading also works well to lighten the bodies of ponies who have yellowed over time. This technique is usually used on white ponies, but can also brighten colored ponies. Use aluminum foil or painter's tape for delicate surfaces to cover all painted areas. Be careful when using painter's tape on glitter symbols. There have been reports of it removing the glitter. As with marks, the amount of time varies that the pony will need to be left in the sun, but it usually takes quite awhile.
This photo, courtesy of Relcelestia, shows the difference sun-fading can make. The body has been sunfaded and the head left alone to show the contrast. The time this takes is certainly worth it!
Plasticiser is a part of the ponies' bodies and when it starts to leach out of them you can tell because they start to feel sticky. With some of the smaller accessories, like Brandy the dog or Twinkles the cat, sometimes it causes their paint and faces to smudge off. This can happen both inside and outside the pony or accessory. Once the plasticiser is completely gone, the pony's body will be hard and unbendable. You can likely soften the pony temporarily by applying heat (with a blow dryer or by boiling, for example), but the body will harden again once the pony cools down.
There is currently no known cure for this and it can spread to other ponies. The most common treatment for its breakdown is to wash the ponies with Dawn dish soap, dry them (usually by patting, rubbing seems to smear their plastic around), and sprinkle them with baby powder. This will have to be repeated every few months. Most collectors choose to quarantine them from the rest of their collection, but it is debatable whether or not it makes the breakdown process speed up if the ponies are stored in plastic bags.
A great article provided by Black Curtains, A Survey of Plastics in Historical Collections by John Morgan, provides some very interesting information about plasticiser:
"As with cellulose acetate, plasticiser is lost by evaporation and leaching, and through loss of compatibility through changes to polymer and/or plasticiser. Additionally, changes in compatibility of the plasticiser may have been brought about by adsorption of liquids applied to the surface in the form of cleaners and polishes . . . 'Squeeky' toys and dolls moulded from PVC pastes were often found to have a 'tacky' surface due to exudation of plasticiser, and to have stiffened considerably."
These pen marks were removed with a magic eraser. Photos courtesy BabyIceCrystal.
This most often occurs when a ponies legs are bent in a funny way that prevents it from standing correctly. Ponies can get dents in their bodies as well, but this is rare.
Other methods involve boiling the pony, then stuffing paper into it to help it hold its shape while it cools. When the issue is with the legs, usually putting something between them (VHS tapes and some books are usually the right thickness), and letting the pony sit for a period of time will shape the legs back into place.
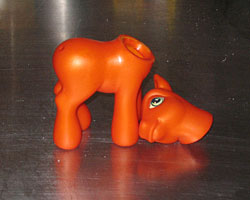
Pony Cancer
Photos courtesy nina85.
Whether it be the family dog, or the child herself was the culprit, chewed body parts is extremely common in ponies. This used to be a life ender for the pony, but now thanks to Sculpey, Apoxy Sculpt, and similar products, just about any of these defects can be corrected. How well this turns out depends on how good you are at sculpting and mixing paint colors. Practice makes perfect, and hey, what you do can't look worse than those missing ears, right?
Courtesy BlackCurtains.
Courtesy MustBeJewel.
Includes:
- Head Removal - Mold (brown, smooze/pin dot mold, pony pimples) - Plasticiser - Regrind - Rust -
- So Softs (cleaning, de-flocking, re-flocking) - Stain Removal - Uneven Legs & Bodies -
Cleaning Tips
Luckily, the general cleaning of ponies is quite simple. Dawn Dish Detergent will remove dust and a lot of surface dirt. Sometimes it also seems to brighten the pony's color. Mr. Clean Magic Erasers will remove more stubborn surface dirt and an OxiClean bath will get rid of more deeply embedded dirt and often brightens the pony's color. Use pipe cleaners or bottle brushes to scrub the insides of the pony. Every collector has his or her own favorite method and tools for general cleaning. You'll quickly develop your own as well! Yum-Yum at the MLP Arena has a cute cleaning video available here: My Little Pony - basic wash and style tutorial.
Dyeing Bodies
Dyeing ponies doesn't seem to have much usefulness for restoration and pretty much falls into the realm of the customizers. I do have high hopes that someone will eventually find a way to fix regrind and hide stains using dye, so I'm including a tutorial about it. The dye doesn't affect eye paint or symbols, but it will dye the pony's hair so you'll have to remove the hair while dyeing and then replace it, or do a complete re-hair once you're finished. Keep in mind that the pony's original body color will affect the end result of the dye job. You probably can't turn a dark purple pony yellow, for example.
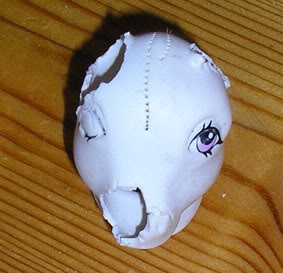
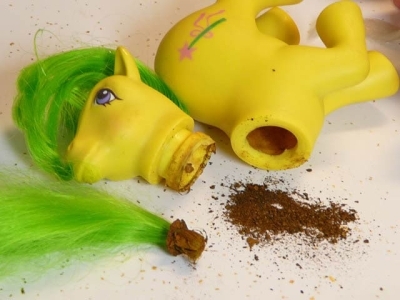
Head Removal
Regular Heads, G1, G2, & G3
Mold
Brown Mold
Ponies are made of vinyl, which is porous and prone to growing mold. There are two types of mold most common in ponies, what I'm going to refer to as "brown mold" and "smooze", also known as "pin dot mold". There is also a type of mold that has recently been identified which I will refer to as "pony pimples". Any type of mold CAN and WILL spread between ponies if left untreated.
Smooze/Pin Dot Mold
For smooze that isn't ingrained too deeply into the pony's vinyl, sometimes rubbing it with acetone fades it. Mr. Clean Magic Erasers and/or boiling/soaking in OxiClean often removes it. For smooze that is embedded more deeply than this, you'll need to do some serious scraping.
"Its rather simple. Things you need:
- Bathroom/kitchen sink
- REALLY hot water
- smoozed pony
- liquid antibacterial soap in a pump bottle for easy access
- fingernails (or a small steel brush would do I suppose for the fingernailless among us)
- patience
Run the water really hot, until it steams. Be careful to keep your fingers away from the stream! Now, after waiting for the water to get hot we take the pony and hold one affected area under the stream. For smooze removal, its best to tackle one area at a time.
You may have to hold the area under the stream for a minute or two. What we are doing is using the heat to open up the pores in the plastic. It doesn't hurt the pony, nor is it noticable. It just allows us the ability to remove the smooze.
Once you think its been long enough, add a dallop of anti-bacterial liquid soap directly to the smoozed area.
Once you think its been long enough, add a dallop of anti-bacterial liquid soap directly to the smoozed area.
Now, lather the soap, rubbing it into the affected area. Once that's done, use your fingernail (or steel brush, you poor, poor fingernailless friends) to scrape back and forth across the smooze. Like you're trying to scrape a sticker off a packaging. Really scrub.
Rinse off the soap and check the area. This is where patience comes in. Some of the dots should be gone, but more than likely, you're gonna have to retreat. Hold her back under the water again, after a minute, lather, scrub, rinse, repeat if necessary.
The key is patience, patience, patience.
Ears - easiest to clean, Feet - next easiest, Wings - harder, but not difficult, Necks/bodies - woah, takes a TON of time, but do-able most of the time. So grab your smoozed ponies, and get to cleaning!"
Plasticiser Breakdown
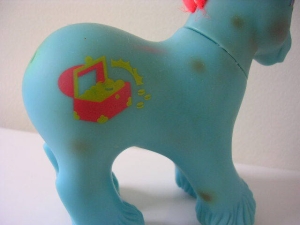
Regrind
Regrind is believed to occur in vinyl where Hasbro "recycled" old vinyl by melting it and mixing it with another color. It starts to show up as the vinyl ages and the colors separate. Unlike pony cancer or mold, regrind appears in large colorful blotches. It won't spread to other ponies and currently there is no known cure. The only option right now is to paint over it. Attempts to dye it usually end up with a pony that is darker in color, but still has mismatched blotches.
Rust
Rust most often occurs inside ponies that have been exposed to water. They have metal washers in their tails and seaponies have metal weights in their bodies, which is why this occurs. OxiClean baths will often remove rust. For stubborn cases, try CLR or Rit Rust Remover. Use pipe cleaners and/or bottle brushes to really get in there and scrub. Make sure to remove the weights and washers from their bodies and tails. Removal and replacement of the tail washers is discussed in the hair section of the site.
Magic Star was cleaned up using OxiClean and bleach.
Photos courtesy Emery.
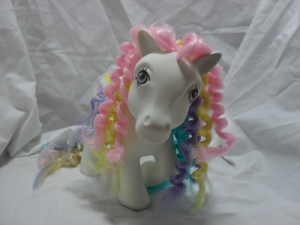
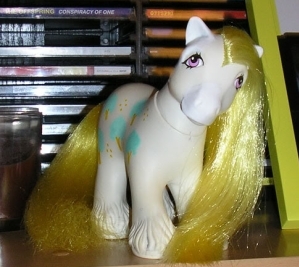
So Soft Ponies
De-flocking
De-flocking a so soft isn't exactly a restoration, but sometimes their flocking is just beyond hope. For these so softs, de-flocking is often a second lease on life. A brightly colored very pretty second life, it turns out. They're actually quite colorful under all that yellowed flocking!
Re-Flocking
Stain Removal
Try Mr. Clean magic erasers first. If you used them for general cleaning, and your pony still has marks, try rubbing a little harder. Remember to be careful over any painted areas. It's really amazing the marks magic erasers can get off of ponies.
Rub at tougher stains with a q-tip and nail polish remover. Nail polish remover with acetone tends to work best. Be careful not to get any of the remover on the painted areas of the pony as it will take them off.
If everything else fails, products like Removzit and acne products containing 10% benzyl peroxide, such as Clearasil or Persa-gel, can remove many tougher stains. Rub the affected area with your chosen product and let sit 15 - 30 minutes. Rinse and continue to let the pony sit. These will usually continue to lighten the area for awhile after the product has been removed. Repeat as necessary. Be extremely careful not to leave the product on for too long as it is possible to over-bleach the stain. Be aware of the color of the pony that you are working on, as these are relatively harsh treatments can fade or yellow the bodies of certain colors of ponies. It's always best to test in an inconspicuous area. RemoveZit works best on white, yellow, pale pink, or flesh-colored ponies. It leaves marks that look like regrind on many other body colors. Benzyl peroxide works best with yellow and orange ponies. Test it on white and pink ponies, do not use it on green, aqua, blue, purple, and deep magenta ponies.
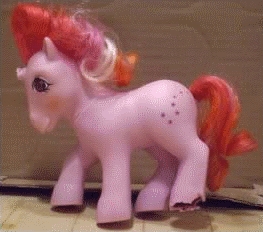
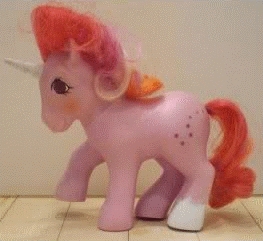
Uneven Legs & Bodies
Photos courtesy angel_rose.
Body Parts
Home
Goals
MLP Restoration
- Body
- Hair
FarDreamer


Rit Dye is the most popular product for any sort of dye project involving ponies. It comes in liquid, crystal, and powder forms. You’ll have to decide for yourself which version you’re the most comfortable working with. It will stain surfaces and containers so be sure to cover counter tops and such with newspaper and use bowls and containers that will not come into contact with food.
Heat the water to boiling, remove from heat, and mix in your dye. You can make the pony darker and/or brighter by letting it soak longer, or by adding more dye to the water. You can always put the pony back in the mixture or add more dye, so ere on the safe side and use less dye at first.
Continuously stir the water as your pony is soaking to keep the dye mixed evenly in the water. You can also hold the pony down in the water with tongs to help it absorb the dye evenly. Different collectors have different opinions on whether or not to remove the pony’s head.
After the pony has been in the dye for a few minutes, check for areas where the color is not changing due to the presence of excess glue. Sand off the excess glue, or remove it using acetone (this can also be done before you start the dyeing process, if the glue is visible), then continue with your dye job.
Once your pony has reached your desired color, wash its body to remove any excess dye. If you also dyed its hair, you’ll likely have to wash it several times to get out all the extra dye. You might also want to give the pony an OxiClean bath.
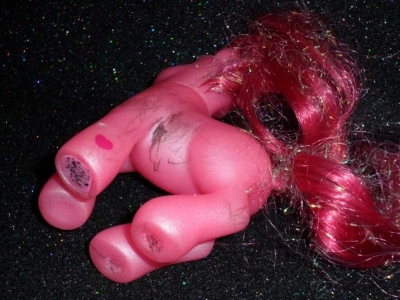
Lots of regular pony heads can be removed by gently tugging and squeezing at them. Use a thin blunt object to pry off any sections that are still glued to the body. X-Acto knives are very popular for this and the blades can be reversed to help avoid accidentally cutting into the pony's neck or body.
For tougher heads, dip dental floss, sewing cotton, or thread in nail polish remover or acetone, and use it to saw at the neck seam.
If you want, you can glue the heads back on using a craft glue such as Aleene's Tacky Glue. Luckily, ponies usually have small indentations on their heads and bodies so you can see how they're supposed to line up.
The only way to tell the difference between brown mold and pony cancer is that this type of mold usually has a dark dot in its center. There is no known cure for this type of mold, but it is treatable using the same methods as pony cancer.
Treatments usually involve one or both of the following, bleach treatments, and/or boiling/soaking infected ponies in OxiClean. Molds can't live without moisture, so be certain to dry the pony completely if you choose a method that involves water.
Most collectors choose to quarantine infected ponies by storing them in plastic bags away from other ponies. Many collectors also put moisture absorbers in the bags, such as silicone packs.
There have been reports of this type of mold being lightened by sun-fading, rubbing the spots with acetone, and using Remove-Zit on yellow and white ponies.
Another method that is largely untested is to paint over the mold, to simply hide it. This won't prevent its spread, but can potentially make the pony look better.
Photo courtesy Raemarie.
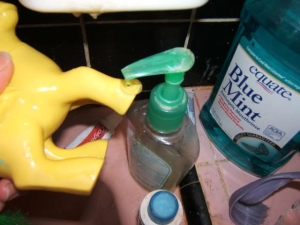
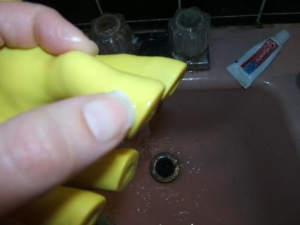
The method of de-flocking so soft ponies that involves the use of Acetone and Jasco seems to be the most popular. Wear rubber or latex gloves while doing this as this method uses multiple nasty chemicals. Also be sure to work in a well ventilated area and follow all directions provided on the product’s label.
First, soften the glue that is holding on the flocking soaking the pony in an OxiClean bath of hot or boiling water. Scrub off as much of the flocking as possible using your fingers or a toothbrush. If you choose to use a brush, be careful not to scratch painted areas like eyes and symbols. Rinse the OxiClean off your pony once finished.
Next, using cotton balls, rub the non-painted areas of the pony with Acetone. Do not let it touch any painted areas as it will take the paint off. Once various body parts are wet with the Acetone, you can GENTLY scrape off the flocking and glue with a sharp object. You can soak non-painted body parts directly in the Acetone to help them soften more quickly. Use Acetone and or a gentle sanding to remove any excess glue from the pony. Rinse the pony again, also washing it with Dawn dish detergent as needed.
Wet the painted areas of the pony with Jasco and let it sit for 5 to 15 minutes. Remove the flock off the painted areas by scrubbing them with a cloth or toothbrush. The Jasco miraculously doesn’t remove paint from the pony, but be careful not to scrub so hard that you scratch the paint. Rinse the pony again, also washing it with Dawn dish detergent as needed.
You’ll probably need to condition your pony’s hair once this is finished.
Contact your city or county to find out how to properly dispose of your left over chemicals. You should never dump chemicals down the drain.
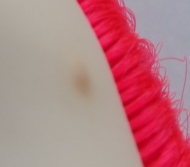
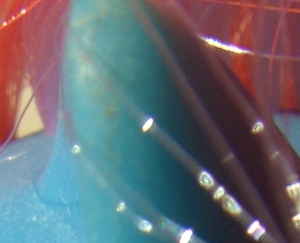
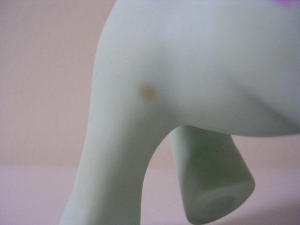
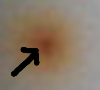
Pony Pimples
Raised dots and bumps on a pony's head or body that contain fluid or white goo are likely a type of mold.The bumps themselves are usually white or brown, but can be other colors. Squeeze or prick the bump with a needle and let anything inside drain out. Once finished, disinfect the area with any product you prefer. Information courtesy Raemarie.
Bumps on the pony's head or body that are not filled with any type of fluid may or may not be mold. Theories on what causes these range from a reaction to heat to reactions to chemicals in the pony's environment. It doesn't hurt to disinfect these, just to be safe.
Photos courtesy Creampuf. She also includes a very detailed dyeing tutorial if you have more questions!
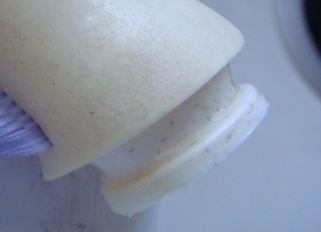
You'll need to remove your ponies' heads to clean inside them, while boiling them, and for projects like re-hairing.

Courtesy Salamandra.
Photo courtesy Avea2006.
No one knows exactly what causes pony cancer or even what it is, but the theory that it is caused by a deterioration of vinyl from age is the most popular. There is also some debate over whether or not it can spread to uninfected ponies. Most collectors believe it can.
There is no known cure, methods for preventing its spread range from rubbing it with acetone, bleach, and boiling infected ponies in OxiClean. There is a lot of debate about this as well as some collectors believe that moisture causes the cancer so boiling a pony will make it spread. However, the boiling method is the most popular and the majority of collectors swear by it.
The only agreed upon method seems to be simply to quarantine infected ponies by storing them in plastic bags away from other ponies. Many collectors also put moisture absorbers in the bags, such as silicone packs.
There have been reports of the cancer being lightened by sun-fading, rubbing the spots with acetone, and using Remove-Zit on yellow and white ponies.
Another method that is largely untested is to paint over the cancer, to simply hide it. This won't prevent its spread, but can potentially make the pony look better.
Here's a lovely tutorial courtesy Rhys: Pindot Removal.
Photo courtesy Raemarie and Sea_Breeze.