Replacement
You can make the pals from the Baby Pony Wear with Pocket Pals line using craft supplies like pom poms, googley eyes, and felt.
You can sculpt the plastic accessories that with the pony wear using Sculpey or Apoxie sculpt. If you're ambitious, you can also try a casting kit.
Here's a great tutorial on how to make flutter wings out of plastic 2 liter bottles: Little Pony Heaven Flutter Wing Tutorial. They don't look like the ponies' original wings, but are super cute.
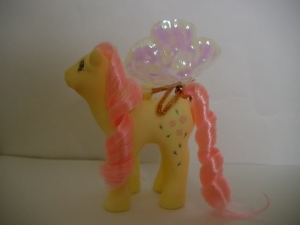
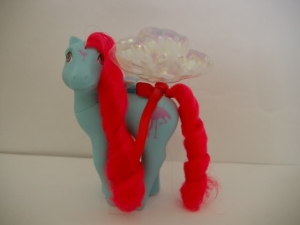
In these photos, courtesy of BabySnuzzle, RoseDust has her original flutter wings, and Tropical Breeze has reproductions.
You can order reproduction flutter wings that are almost indistinguishable from the originals from a lady in Germany using the name a8aglia and touch-of-an-expert on Ebay. They are called primavera repro wings, but are commonly referred to as "Nora's repro wings" by collectors. Unfortunately, they are not always available, but rumor has it that sometimes she will sell them to you directly if you contact her through her feedback page.
Smoke Smell
Your basic cleaning techniques, especially an OxiClean bath, are likely to get rid of the smell of smoke attached to a pony. However, if this fails, you can't go wrong by simply airing the pony out. The better ventilated the quicker it will work. Spraying the pony with Febreeze, inside and out, and its hair, and leaving the pony in a sandwich bag filled with baking soda, are also popular methods.
Body Scents
For ponies of all generations who's bodies are scented, but the scent has faded, try leaving them in a ziplock bag for an extended period of time. This will often bring the scent back. Be careful not to leave the G1 Sweetberry and Sundae Best ponies in the bag for too long, as the chemicals used to make them smell sometimes turns their hair an ugly brownish green.
Includes:
- Happy Tails Ponies - My Pretty Pony - Playsets (repair, stickers, yellowing) - Plushies (cleaning, eyes) -
- Ribbons & Pony Wear (cleaning, repair, replacement) - Scents (body, smoke smell) -
- Sweet Talkin' Ponies (battery replacement, cleaning, repair) - Windy Wings & Summer Wings -
Accessories
Replacement
Need an accessory and don't want to/can't buy a replacement? If you can borrow one from someone else, you can try making your own using a casting kit. You can also sculpt them yourself using products such as Sculpey or Apoxie Sculpt.
Repair
For minor repairs to accessories you can't beat super glue. You can also sculpt small bits that have broken off using Sculpey or Apoxie Sculpt. Apoxie Sculpt is likely the best choice in this scenario since Sculpey has to be baked to harden and some types of plastic don't do well in the oven.
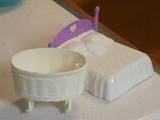
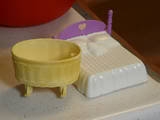
Yellowing
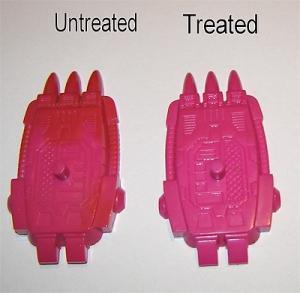
Yellowed accessories, both white and colored, can be brightened using hydrogen peroxide. This tutorial is courtesy Gizmo at the MLP Arena, with the images and information originally coming from: Transformers Fan Art, Kitbashes & Customs and The Transformers.net.
Lady Twilight's website has excellent close up images of tons of accessories. You can use these when trying to replicate various accessories, for color matches, and to see what the stickers on them look like.
Emery at the MLP Arena has had a lot of luck whitening a baby buggy by smearing it with hair cream containing hydrogen peroxide and letting it sit. These images show the progression over an eight day time period.
Flutter Wings
My Pretty Pony
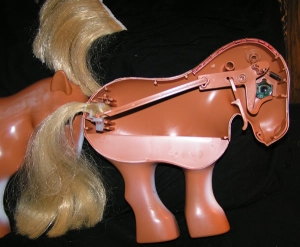
Internal workings of Pretty Pony (and how to fix them), tutorial and photos courtesy BarbedDragon.
"She was pried apart as carefully as possible with some metal clay tools (Flat head screwdriver would have worked too, just didn't have one)
SO here's what she looks like inside.....(children avert your eyes)
SO here's what she looks like inside.....(children avert your eyes)
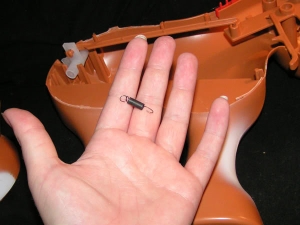
and here's that pesky little spring which you can see attached correctly in the first/last pics.
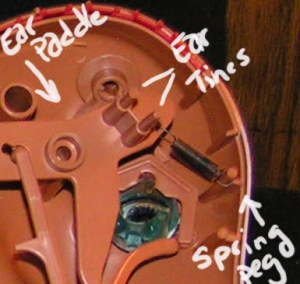
The other thing to fix them (Both ears wiggle, one eye blinks, and the tail swishes) is when you put them back together make sure you place the ear PADDLES back inbewteen the paddle tines---Like so---on both sides. Its harder than it looks believe me.
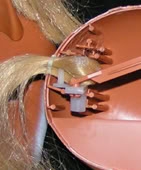
The tail hair loop goes between the white hair tines as well.
Hope that helps anyone that wants to fix theirs, tho I do recommend to be prepared to fix cracks and fractures, or know how to sculpt/repair them. Its easier if they are a little warm, but sometimes that makes the plastic tear easier (not a good thing) so be careful!!!"
Playsets
Repair
Super glue will hold little pieces that have broken off your playsets in place. You can sculpt missing parts with Apoxie Sculpt. Do not use Sculpey as it needs to be baked, and many plastics, particularly the one's used to make MLP playsets, don't do well in the oven.
Here's some information on Dream Castle restoration. These techniques should work on any playset.
Dava's Dream Castle Repair Kit and Restoring a Dream Castle. And this thread: Dream Castle "fixer-upper".
Stickers
Here are stickers for various playsets. Several of them are the European versions. Print these off on shiny sticker paper (available at most craft stores) and cut them out to use as replacements when your playsets are missing stickers, or they are beyond repair. You'll likely need to do some re-sizing and photo shopping to get them just right.
E-mail me at MLPpreservation @ gmail.com if you have scans of stickers you would like to donate! Several of these were saved quite awhile ago for my own personal use, from a website that is no longer available. If you know who I should credit them to, please e-mail me.
Courtesy Chrissytree
Paradise Estate 1
Paradise Estate 2
Perfume Puff Palace
Perm Shoppe
Petite Royal Pony Palace
Pretty Parlor
Show Stable 1
Show Stable 2
UK Kitchen
UK Schoolhouse
Yellowing
The same products that whiten and brighten plastic accessories will work on playsets, you just have to get a little more creative about applying them, since playsets won't fit in a jar! Be careful not to get these products on stickers or fabric, as the peroxide might harm them.
See:
Yellowing/Mold treatment using H2O2?
&
Plushies
Cleaning
One of the simplest methods for cleaning plushie ponies is to wrap them in a pillow slip, tie the pillow slip closed, and run them through the washing machine. The pillow slip helps prevent their eyes from scratching and keeps them from getting beat up in the washer. Set your machine to the gentle cycle, use any brand of laundry detergent, and warm water. Both hot and cold water can set stains. Lay them out to dry. This will probably take awhile as they are thick. It's probably best not to put them in the dryer as there are reports of the heat frizzing and melting their hair.
Wash their hair as needed with any shampoo and condition with any conditioner of your choice.
For tougher stains on G1 plushies, and for cleaning giant G3 plushies, use the spray version of OxiClean, and gently scrub with a soft toothbrush. Many collectors have also had luck cleaning plushies with spray on carpet cleaners. Be sure to test an inconspicuous area for color fastness first!!! Always thoroughly rinse off any chemicals you apply to your pony.
Eyes
A popular method for touching up scratches on plushie eyes is to simply fill them in using a black Sharpie marker.
Ribbons & Pony Wear
Cleaning
Similar to plushie ponies, ribbons and cloth pony wear can be washed by tyeing them in a pillow case and running them through the washing machine. In this instance, the pillow case is to prevent them from getting lost because of their small size. Use the gentle cycle and warm water as hot and cold water will set stains. Use any laundry detergent of your choice.
You can also hand wash them in the sink. For tougher stains, try any stain remover that you might use for your own clothes. Remember to test for color fastness first.
Vinyl pony wear, such as shoes, can be cleaned using many of the techniques for washing pony bodies. Wash them with Dawn dish detergent and rub off stains with nail polish remover. If you try other methods, like an OxiClean bath, be extremely cautious with the temperature of water so that they maintain their shape.
Repair
A needle, thread, super glue, and fabric glues are your best friends when repairing the common wear and tear that is found with pony wear. You'll also need Velcro to replace the fasteners that often fall off. You can find this at craft stores.
Scents
Windy Wings & Summer Wings
Here's a tutorial on how to make replacement summer and windy wings: Winger Tutorial.
Home
Goals
MLP Restoration
- Body
- Hair
- Miscellaneous
FarDreamer


- Get a clear glass jar with a seal tight lid (I use an mayonnaise jar like this one with the label removed)
- Buy a Jar of Hydrogen Peroxide with at least 6% w/v from a Pharmacy or Super Market (Pharmacy is more reliable)
- Fill the glass container with the appropriate volume of Hydgrogen Peroxide depending on the size of the yellowed piece.
- Once the piece is submerged, expose the jar to sunlight for a few days (oh the irony! ) until the plastic color is 'corrected' to your satisfaction. During this process you will see thousands of small bubbles covering the surface of the plastic - This is the Hydrogen Peroxide at work.
Advice: Try not to have too many pieces of plastic in one jar. The crowding of pieces slows the process as they shield each other from sunlight.
Note 1: Some plastics are more successful at regaining their color than others but something that seems consistent from my experience is that there is always a considerable improvement. It seems that different plastic types regain their colors at different rates - The level of yellowing is also a factor in the length of the submerged time period.
Warning: Hydrogen Peroxide is corrosive to metal. However from what's available in retail, the level of concentration is so low that it seems negligible. I have not seen any corrosion in metal rods and pins joining plastic parts even after being submerged for a couple of weeks.
Warning 2: Although most painted parts will not be affected by the Hydrogen Peroxide, there is documentation that some do. Toys with painted detailing which fades with exposure to the Hydrogen Peroxide includes: AM Megatron (Purple).
VERY IMPORTANT WARNING: Hydrogen Peroxide is also toxic so try to avoid exposing your skin to it. Try to use gloves and if it goes on your skin, wash the affected area immediately.
Note 2: I have used this process in at least half a dozen toys without any ill effects to the plastic even after more than a couple of weeks submerged. It's been about a year's time since my first attempt and the plastic of the toy in question is still fine. However regardless of success, the plastic is still vulnerable to yellowing again if exposed to UV rays because that's the nature of the plastic.
Disclaimer: Although I have been successful with several toys using this procedure and I have not observed any ill effects on the plastic - there is no guarantee that it will work for you and there is always the possibility that some plastics may not react well to the Hydrogen Peroxide so proceed at your own risk.
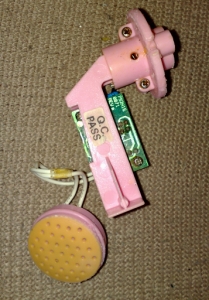
Sweet Talkin' Ponies
Battery Replacement
The Sweet Talkin' Ponies' heads screw off. Inside are three batteries that are inside a compartment held together with two small screws. You can get them out once you remove the screws. You should be able to find replacement batteries at any store that sells batteries for watches or specialty toys (this includes the jewelry section at stores like Wal-Mart and Target). The easiest method is to just take the old batteries in with you and let them figure out what size of replacement you need.
Cleaning
You can clean the inside of the battery compartment using Q-tips and rubbing alcohol.
Repair
You'll have to get really creative for this to work, but if replacing your pony's batteries doesn't fix her, you can try replacing the speakers and various components that make up the sound mechanism. Try searching electronics stores and specialty toy stores for parts. Some electronics stores might be willing to fix it for you.
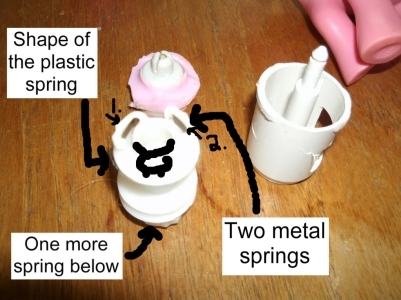
Here's a tutorial courtesy Chrissytree that shows how the mechanism inside a Brush n' Grow pony works. Also check out: Re-Pairing a Brush 'n' Grow Pony.
Showing the position of the metal springs, they lie inside the plastic springs at the top and bottom and there's a sheet of plastic between them and the rest of the mechanism. The top is the same shape as the bottom with three springs."

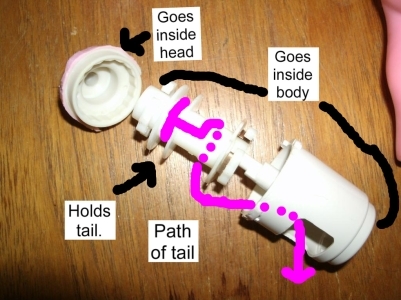
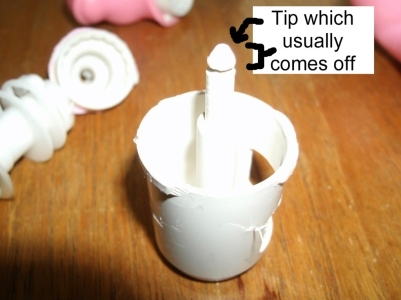
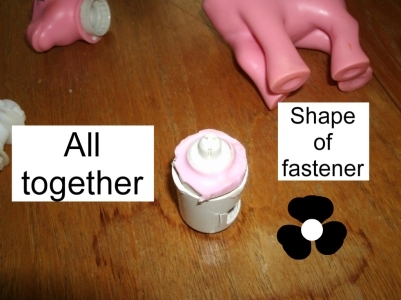
Brush 'n Grow Ponies
"I've cut all of the pieces out and this is how they go back together...
This part is moulded in at the neck and the hole is for the tail to go out.
Showing the shape of the hole in the head piece - the three prongs are pretty solid and you have to be able to push the pin through the hole to put the head back. It's also very well moulded onto the head so you have to cut right the way around watching out for the uneven shape.
Happy Tails Ponies
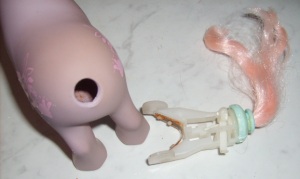
Photo and information courtesy AnnoMundi.
"You remove the head and then bend out the whole thing inside her. Then you can remove the "tail ring" which makes it easier to clean the whole tail."
"You remove the head and then bend out the whole thing inside her. Then you can remove the "tail ring" which makes it easier to clean the whole tail."
Photo courtesy Wysteria_UK.